
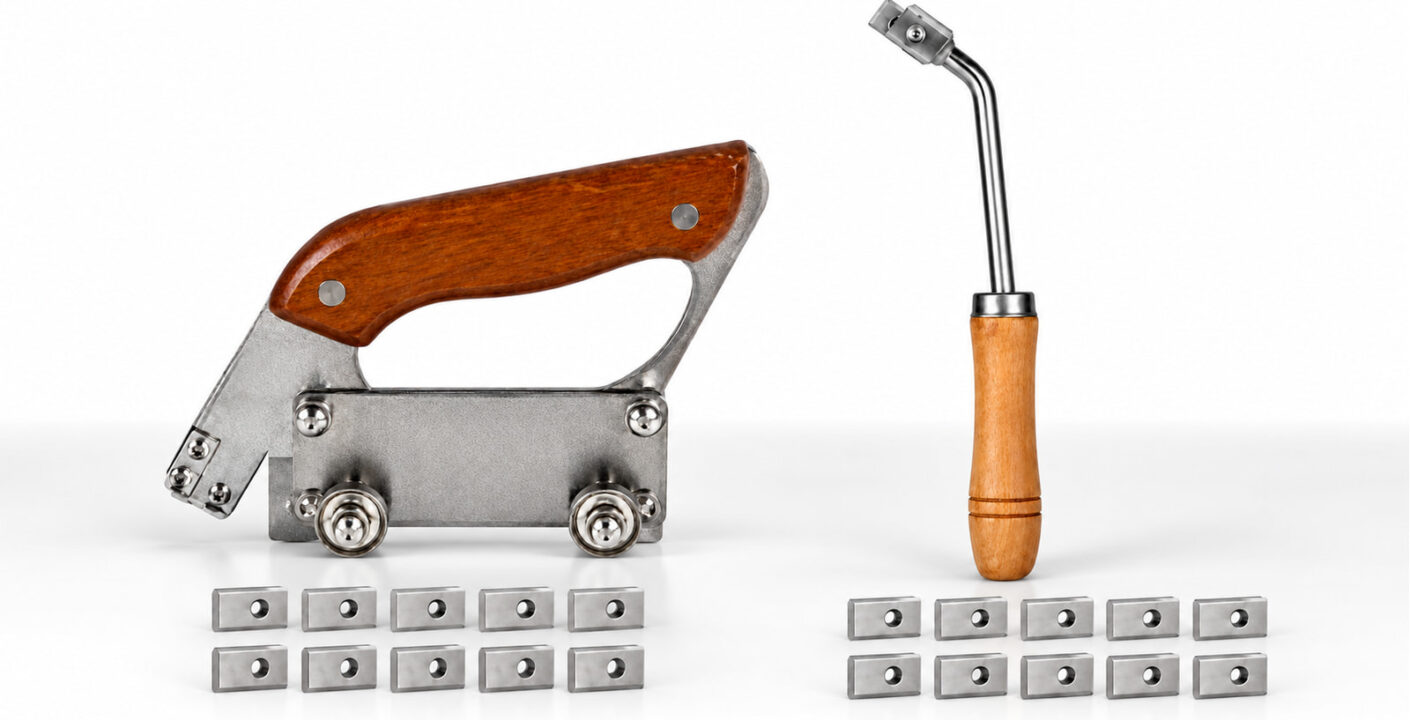
Two tools described as “wooden-handle floor groovers” can arrive with completely different working structures. One has a top grip and wheel frame; the other has a straight handle, an extended shank and a cutting head at the end. For an importer or private-label buyer, that distinction affects the sample request, product listing, spare-parts record and eventual order.
When comparing wheeled vs straight handle vinyl floor groovers, identify the support and cutting layout first. Then check grip, access, blade configuration and trial grooves in the intended flooring. The shared handle material is useful information, but it does not make the tools interchangeable.
This comparison uses ARIK’s wooden-handle wheeled model and 220 mm wooden straight-handle model. It provides a practical checklist for deciding which structure to assess and how to specify the selected version clearly.
Identify the Structure Before Comparing the Handle
Wooden-Handle Wheeled Groover
O wooden-handle wheeled floor groover combines a top wooden grip with a wheel frame and cutting head. Its current listed overall dimensions are 160 × 55 × 110 mm, and its listed net tool weight is 0.6 kg. The full product SKU is KCQDXLMBXXXXXXXX.
The frame is part of the working arrangement. Buyers need to assess where the wheels sit, how the tool follows the intended seam and whether the cutting head and grip can reach the work position. Wheels do not make this a powered tool or establish automatic tracking or a fixed cutting depth.
Wooden Straight-Handle Groover
O straight wooden-handle floor groover has a different layout: a grip, extended shank and end cutting head without the same wheel-frame support. Its current listed overall length is 220 mm, handle diameter is 27 mm and net weight is 0.6 kg. Its full SKU is KCQMB220MMXXXXXX.
This layout is a candidate for assessing local seam positions where a wheel frame cannot enter or retain suitable support. Access still depends on the cutting head, shank, hand space and required movement. An extended handle does not establish that every corner or wall-side seam is reachable.
Ask for a side view and a cutting-head view with the model identifier. A product name mentioning wood alone leaves out the feature that most clearly separates these two tools.
Compare Support, Grip and Access as Separate Questions
What Supports the Tool Along the Seam?
For the wheeled model, inspect the wheel rotation, frame support and relationship between the guide arrangement and cutting path. The sample should allow the intended support to remain in contact throughout the proposed run. Check the entry and endpoint as well as the convenient middle section.
For the straight-handle model, assess the cutting movement and control independently. It does not have the same wheel-frame reference. A satisfactory result with a wheeled tool cannot be transferred to the straight-handle version simply because both use a wooden grip.
Neither structure should be accepted on appearance alone. The fitted cutting edge, material and operator’s working method also affect the resulting groove. Keep structural observations separate from the groove inspection so that each finding remains useful.
Where Does the Hand Need to Be?
The wheeled model places the hand above the body. Include that grip and the operator’s usual gloves when assessing overall height and clearance. A frame that fits beside an obstruction may still leave too little room for the hand.
The straight handle places the grip along the shank’s working layout. Inspect the space needed for the complete movement, including any approach or withdrawal. The cutting head may enter a restricted position while the shank or hand prevents the intended stroke.
Have the intended user trial the sample in the actual posture. Record what the user can hold and guide consistently. Avoid turning a grip preference into a universal statement that wooden handles are more comfortable, require less effort or provide greater precision.
Can the Cutting Head Reach the Required Position?
Describe the seam position before asking which tool is better. A supported flat seam, a seam ending near a frame and a corner transition present different access questions. Photograph the obstruction and show the proposed direction of travel.
The wheeled arrangement is worth assessing where its frame can travel with the required support. The straight-handle arrangement is worth assessing where its head and shank offer a workable local approach. Confirm the complete path with a representative mockup before accepting either selection.
Use Dimensions to Screen Fit, Then Check the Sample
The listed measurements describe different shapes. The wheeled model’s length, width and height form an overall body description. The straight model’s 220 mm figure is an overall length, and its 27 mm figure describes the handle diameter. They are not equivalent measures of the working space each tool needs.
For the wheeled sample, measure the complete tool in a stated configuration and check the space occupied by the grip and frame. For the straight-handle sample, record the head, shank and grip positions together. Keep a dimensioned photograph with each sample record.
Both models currently list a net weight of 0.6 kg. That does not establish identical handling, balance or operating effort. It also means the presence of wheels is insufficient evidence that one of these two complete tools is heavier.
Keep net tool weight separate from packaged gross weight and carton weight. A purchasing comparison should identify what was included in each measurement. Otherwise, a sample shipped with spare blades and protective packing can be compared incorrectly with a bare tool.
For a range containing several ranhuras para pisos de vinil, separate the structure, model, grip material and measurement scope in the product record. This allows the sales team to distinguish options without inventing a performance ranking.
Verify Blades Independently for Each Model
Blade identity deserves its own check. Shared handle material, a similar fastener or a familiar-looking cutting head does not prove that blades are interchangeable between the two structures. Request the correct replacement part for each selected model.
The straight-handle model’s current record includes a 19 × 12 mm blade outline. Those dimensions describe the blade’s external shape. They do not establish a 12 mm groove, a usable projection or a confirmed groove-depth range.
For the wooden-handle wheeled model, obtain the actual blade and mounting details for the supplied version. Do not borrow a blade specification or adjustment range from the 1.0, 2.0 or another manufacturer’s wheeled tool.
A practical blade record should include:
- The complete tool model and supplier’s replacement-part reference.
- Blade outline, cutting-edge geometry and mounting details.
- The supplied setup and permitted adjustment or replacement method.
- The number of blades fitted to the tool and supplied separately.
- The groove profile demonstrated in the intended flooring.
Check these details against a physical sample and the supplier’s instructions. Where a steel grade, hardness, coating or cutting capability matters to the purchase, request supporting information for that exact blade. Leave an unconfirmed field open rather than filling it from an adjacent model.
The comparison image shows loose blades beside the tools for identification. The displayed quantity is not a confirmed standard supply quantity. Agree the contents list for each order and use that list when inspecting deliveries.
Run a Sample Comparison That Separates the Questions
A useful comparison does more than ask an installer which tool feels better. Give both samples the same material and inspection criteria, and record the differences in support, grip and access. This creates a record a buyer can use when confirming a production configuration.
1. Confirm Identity and Condition
Label each sample with its full SKU and a reference photograph. Inspect the wooden-handle surface and connection, the cutting-head mounting and visible condition. On the wheeled model, check wheel rotation and frame alignment as separate observations.
List the parts actually received with each sample. Keep sample-only extras separate from the proposed production packing list. If a sample arrives with a different blade or configuration, resolve that difference before treating the trial as representative of the order.
2. Match the Flooring and Joint Requirement
Use representative material and establish whether the joint requires grooving under the flooring system’s instructions. Confirm the intended groove profile and preparation method before evaluating the tools. Do not choose a universal depth from the tool’s overall dimensions.
Record enough material information to repeat the assessment, including the flooring identity and relevant joint construction. Where a welded joint is being evaluated, identify the corresponding welding system as well. Tool selection should support that specified detail.
3. Test a Supported Run and the Required Local Position
Use a suitable supported seam to observe the wheeled model’s guidance and the straight-handle model’s cutting movement. Then reproduce the actual local position the customer needs to address. Include the wall, frame or transition geometry that affects access.
Check the hand, frame or shank and cutting head throughout the approach, working movement and exit. Record where contact or loss of support occurs. A trial that avoids the obstruction does not answer whether the tool can work beside it.
4. Inspect the Groove and the Adjacent Material
Evaluate groove position and profile using the flooring system’s specified criteria. Inspect the start, middle and end, and check the adjacent edges and backing condition. Separate a tracking issue from an unsuitable cutting edge or inaccessible endpoint.
Record the result for each tool independently. A successful trial supports the specific material, blade and setup tested. It does not demonstrate every flooring type, corner shape or operator posture. Reassess relevant changes before extending the method to another application.
5. Keep Evidence That Another Person Can Follow
Save labelled photographs of the tool setup, working position and inspected groove. Note the operator’s observations in direct terms, such as a frame contact point or a grip change. Avoid unsupported summaries such as “professional grade” as a substitute for the recorded result.
If one sample passes and the other needs correction, identify the reason before placing the order. A missing part, different blade or unsuitable mockup is not evidence of an inherent performance difference between all wheeled and straight-handle tools.
Turn the Findings Into a Clear Range Decision
Consider the wooden-handle wheeled model when the intended work supports its frame and the user can guide the top-grip arrangement through the seam. Confirm the blade and groove result before making it the selected version.
Consider the straight-handle model when the required local position calls for a different head-and-shank approach. It still needs suitable hand clearance and a satisfactory trial groove. Do not sell the absence of a wheel frame as a promise of access to every wall corner.
Both structures may belong in a range when they address different verified work positions. Give each a distinct description and explain the task it was assessed for. A set should have a defined purpose and contents list rather than imply that two wooden handles create a complete universal grooving system.
If only one model is selected, keep the rejected sample’s observations. They can explain the decision to another buyer or prevent an apparently similar substitute from entering the next order. A substitute should be assessed against the same requirements, not accepted solely because its product name matches.
Specify the Model and Supply Configuration in the Order
An order line reading “wooden-handle floor groover” is incomplete for these two options. State the full SKU and structure, then attach the agreed sample reference, specification and packing list. Use the same identification in the quotation, purchase order and inspection record.
For each selected model, confirm the following information:
- Tool identity: wheeled top-grip structure or straight-handle structure, full SKU and approved sample reference.
- Cutting configuration: blade reference, mounting, fitted quantity and any separately supplied replacements.
- Handle requirements: agreed surface, fastening and supplied care instructions.
- Packing: individual protection, contents label, carton quantity and the scope of quoted weights.
- Acceptance: the material, setup and groove checks agreed for the sample and production inspection.
Confirm the actual commercial terms in the quotation, including quantity, destination, requested delivery date and relevant support scope. Keep this confirmation separate from the tool’s structural description. A catalogue image cannot establish an included accessory, supply lead time or after-sales commitment.
Wood species, finish and cleaning resistance should also be confirmed when they matter to the buyer. Follow the supplied care instructions. The word “wooden” alone does not support a promise about resistance to a particular cleaning agent or repeated treatment.
Keep Private-Label Names Consistent With the Approved Sample
A private-label range needs clear model names before artwork is approved. Include “wheeled” or “straight-handle” in the working description and map the brand’s item number to the supplier’s SKU. Keep the parts and packing records attached to that mapping.
Para private label flooring tools, provide the selected model, quantity and artwork requirements so that the marking position, method and proof can be confirmed for that tool. The available surface and placement must be checked on the chosen structure.
Review the product page, packaging and instructions together. They should show the approved tool and describe its actual configuration. Remove claims of automatic tracking, universal blade compatibility or guaranteed corner access unless the exact supplied model has evidence supporting them.
Keep the final sample reference with the approved artwork and contents list. If a supplier proposes a change to the head, handle, blade or packing, review the affected checks before carrying the old approval forward. This maintains a useful connection between the branded item and the tool that was assessed.
A Buyer’s Checklist for the Final Decision
Before approving either model, make sure the purchasing and installation teams can answer five questions:
- Which complete tool and full SKU does the sample represent?
- Does its frame or head-and-shank layout fit the intended working position?
- Which blade and mounting configuration produced the inspected groove?
- What exactly is included in each supplied unit and replacement-parts order?
- Do the order, packing label and branded description identify the same approved configuration?
Choose by structure and verified application first, then confirm grip preference and supply details. For a comparison with ARIK, send the flooring and joint information, photographs of the working position, required groove profile and proposed order configuration. That gives both sides a clear basis for selecting samples and confirming the model before a bulk or private-label order.
