
A vinyl weld trimming sample acceptance checklist should record three observations separately. Check what the first cut leaves when the flooring system calls for a preliminary trim, how the cooled rod sits against the sheet after final trimming, and whether the blade or guide marked the adjacent flooring. A flush finish describes the surface profile on the section examined. Assess the weld itself using the inspection or test required for the flooring system and project.
For a crew lead, the sample is the reference the installers use before finishing production seams. Agree what the sample must show, make it with the proposed tool and materials, then record what actually passed. A close photo of the finished rod is easier to interpret when it has a sample ID, a stage label and a photo of the blade and guide used.
Agree what the trial is meant to approve
Start with the current installation instructions for the flooring and the project’s acceptance requirements. Identify the floor product, specified rod, type of seam and permitted trimming sequence. If the client or specification provides a measurable limit, record the method, tool and conditions used to check it. When the requirement is an approved visual finish, use the named reference sample and agree how it will be viewed.
Define the scope of the trial before the cut. A flat open run can show the condition of the rod and sheet under that setup. If the crew needs to approve the same tool beside a door jamb or at a change in profile, include a representative detail. Record each location separately so a clean result in open space can be traced to the exact area that was evaluated.
Give the sample a unique ID. Keep a note of the material and rod identifiers, the person making the weld, the person trimming it and the inspection date. Mark the direction of travel on the back or beside the trial area. This makes it possible to match a mark near the end of the cut with the setup and operator’s notes.
Check the blade and guide before making the sample
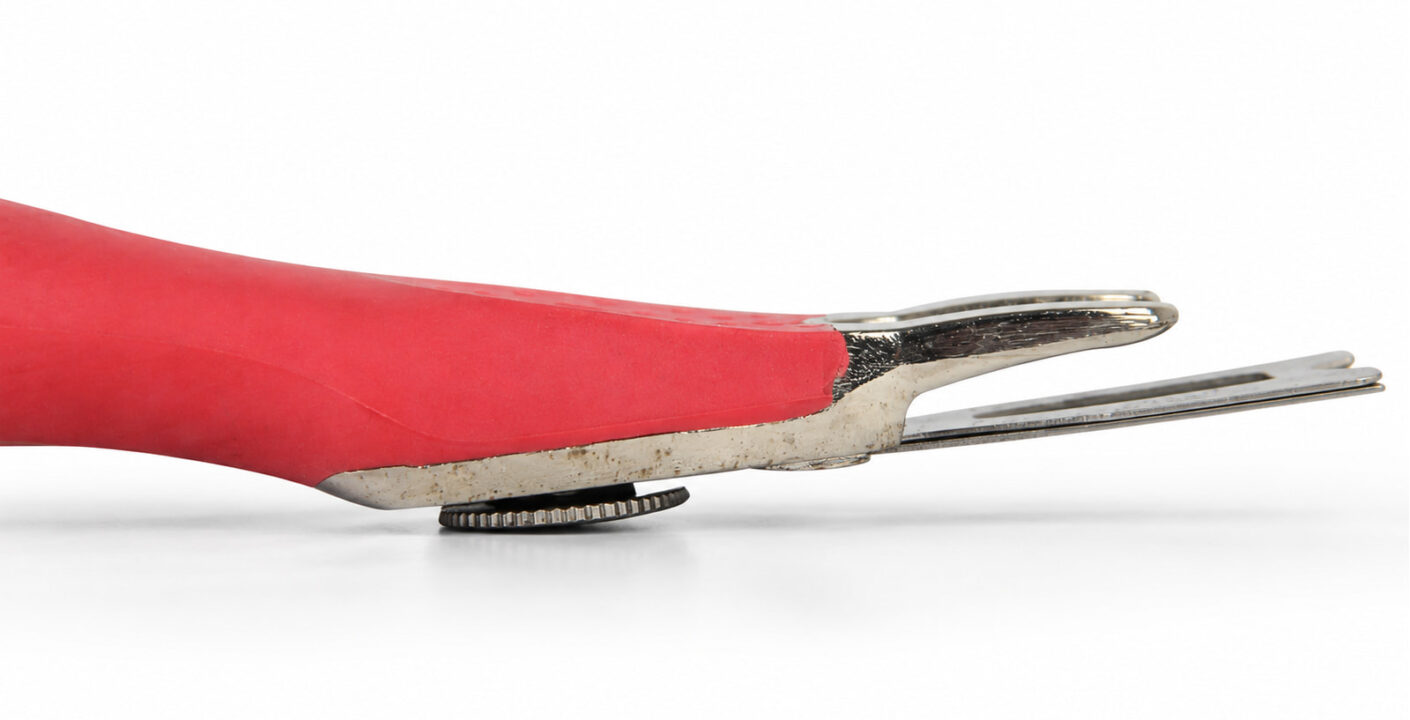
On a spatula-style weld trimmer such as ARIK’s red-handled CPQ, inspect the edge, confirm its seating and identify the guide or support used for each permitted cut. Check whether the guide rests evenly where the process calls for it. Photograph the head from the side so a reviewer can see the relationship between the blade, guide and floor surface.
Record whether the edge is new or already in service, and note any damage or buildup that could affect the cut. Verify the blade reference, mounting features and orientation before evaluating a replacement. The trimming blade compatibility guide lists the fit details to compare with the actual holder and guide.
Keep the tool check separate from the finished sample result. For example, an undamaged blade that sits securely passes the initial inspection. Its performance under the proposed guide and timing still has to be evaluated on the offcut. If a guide is swapped after the initial check, update the sample record before comparing the new result with the old one.
Record the conditions for each cut
Prepare a welded offcut using the same flooring, rod, seam preparation and welding setup intended for the job. Label the start, middle and exit of the section. For a comparison, use equivalent samples, the same operator and the same supporting surface. Change only the item being evaluated, such as the guide, and keep the results with their respective sample IDs.
Note the trimming stage and the actual condition of the rod when each cut was made. The flooring procedure determines when to make each pass and how the tool should be supported. The sheet vinyl heat-welding guide shows where those checks fit in the full installation sequence. Record the sequence used on the offcut so the team can repeat it.
When the system calls for a preliminary cut, keep a photo or a labeled section that shows the remaining rod before the final pass. Record whether the allowance was continuous across the test area and note any interruptions at entry or exit. If the job specifies a one-pass procedure, mark the preliminary cut as inapplicable and inspect the finish at the stage specified for that product.
Inspect the cooled finish from two directions
Clear loose trimmings and look along the seam under good light, then inspect across it from both sides. View the start, middle and end in the same way. A low-angle light can reveal a ridge or an edge mark that is harder to see in overhead light. If the sheet is textured, use the approved reference for that surface and record where the profile was judged.
- Remaining rod. Note whether a raised section is continuous or localized. Mark the position and check whether the raised material is rod or part of the adjacent sheet.
- Low areas. Locate any dip and record whether it follows the whole cut or appears at a start, stop or change in direction. Keep it visible for review before further work.
- Adjacent flooring. Examine the sheet on both sides for a blade nick, scratch or guide track. Photograph any mark before changing the setup.
- Seam edges. Record visible gaps, lifting or other irregularities by location for the separate weld inspection.
Describe the observation before assigning a cause. “Fine mark on the right-hand sheet for the last part of the pass” gives the installer a place to review the guide and tool angle. A label such as “bad blade” gives the buyer little to reproduce. If the suspected cause is debris under a guide, check the contact faces and repeat the affected section on a fresh offcut after cleaning.
If the result differs from the approved finish, keep the original piece and document the change for the retest. For example, a ridge at an otherwise even exit may be related to how the tool leaves the seam. Observe the exit on a fresh sample with the same blade, material and stage. A low spot calls for checking the recorded cooling condition, cut depth and weld profile before choosing a correction under the flooring procedure.
Record weld inspection as a separate result
Use the seam inspection method prescribed for the material at the stage it requires. Forbo’s project vinyl instructions, for example, call for inspecting the bond along the seam after the first trim and waiting until the rod has cooled before the final trim. Follow the exact flooring product’s procedure and record the inspection stage with the result. Forbo Heat Welding Vinyl Products v2.10
Where the approved method allows a localized edge check, a seam-edge inspection probe can help the installer check or mark an accessible edge. Confirm the permitted tool, location and procedure before making contact. Record the area examined and what was observed there. Keep any required strength or sealing test with its own method and result.
Use separate fields for trim appearance, permitted seam inspection and any specified strength or sealing test. The trim result describes surface level and condition on the checked area. A strength claim requires the prescribed test and its acceptance criterion. If a required inspection is outstanding, identify who will perform it and when the seam can be released.
Use one record to brief the next installer
Keep the approved sample or its labeled photos with the work record. Include the tool model, blade reference and condition, guide arrangement, flooring and rod, operator, timing and observed finish. Add the allowed scope, such as the straight flat runs checked, and the disposition of any location that needed a separate tool or retest.
For a crew handover, an entry can read “Flat sample A, cooled final trim, rod level with sheet at start and middle, ridge at exit. Hold exit detail for repeat trial.” Include the photograph and the exact setup. The incoming installer can then see which part of the result needs attention and which conditions to carry into the retest.
Before releasing the configuration, check that the recorded blade and guide match the tools issued to the crew. Use the accepted sample during the first production check and repeat the affected checks if the tool, flooring, rod or seam detail changes. Retain the separately documented weld inspection results alongside the trim sample record.
Give each acceptance decision its own line
Set up the record so a reviewer can see whether the tool setup, the trimmed surface and the weld have each been checked. A single box marked “sample approved” leaves the scope open. Use fields like these on the job sheet and add any measurements or signoffs the project requires.
- Sample identity and scope. Enter the material and rod references, sample ID and seam detail. Specify which rooms or details the sample represents.
- Tool setup. Enter the trimmer, blade condition, fitted guide and the operator. Link the photos showing the assembled tool and the test piece.
- Surface result by stage. Record the first-cut allowance where applicable and the cooled final profile. Mark the position and side of any nick, ridge or low area.
- Weld inspection. List the method required for the job, when it was performed and the result for the relevant area.
- Decision and action. Name the reviewer, the approved scope and the specific check to repeat where a result is outstanding.
For instance, if the open-run sample meets the finish criterion and the corner trial is still due, mark the open-run result on its own line and leave the corner detail open. Keep the weld inspection on its own line as well. The next shift can then pick up the exact check that remains without repeating a finished trial.
Questions from crew leads
What should I photograph for sample acceptance?
Include the sample ID, the blade and guide fitted for the cut, the first-stage allowance where applicable, and the cooled seam from along and across the run. Include the sheet on both sides and identify any marked location.
How do I compare a replacement blade fairly?
Confirm the blade fit first. Trim a fresh, equivalent welded section with the same operator, guide, material and permitted stage. Check the same positions under the same lighting and record the change in blade condition or reference with the result.
Can a flush result release the whole seam?
A flush result can satisfy the surface profile check for the area examined. Review the remaining acceptance requirements for the seam, including the material-specific inspection and any separate test called for by the project. Record each result before releasing the work.
