
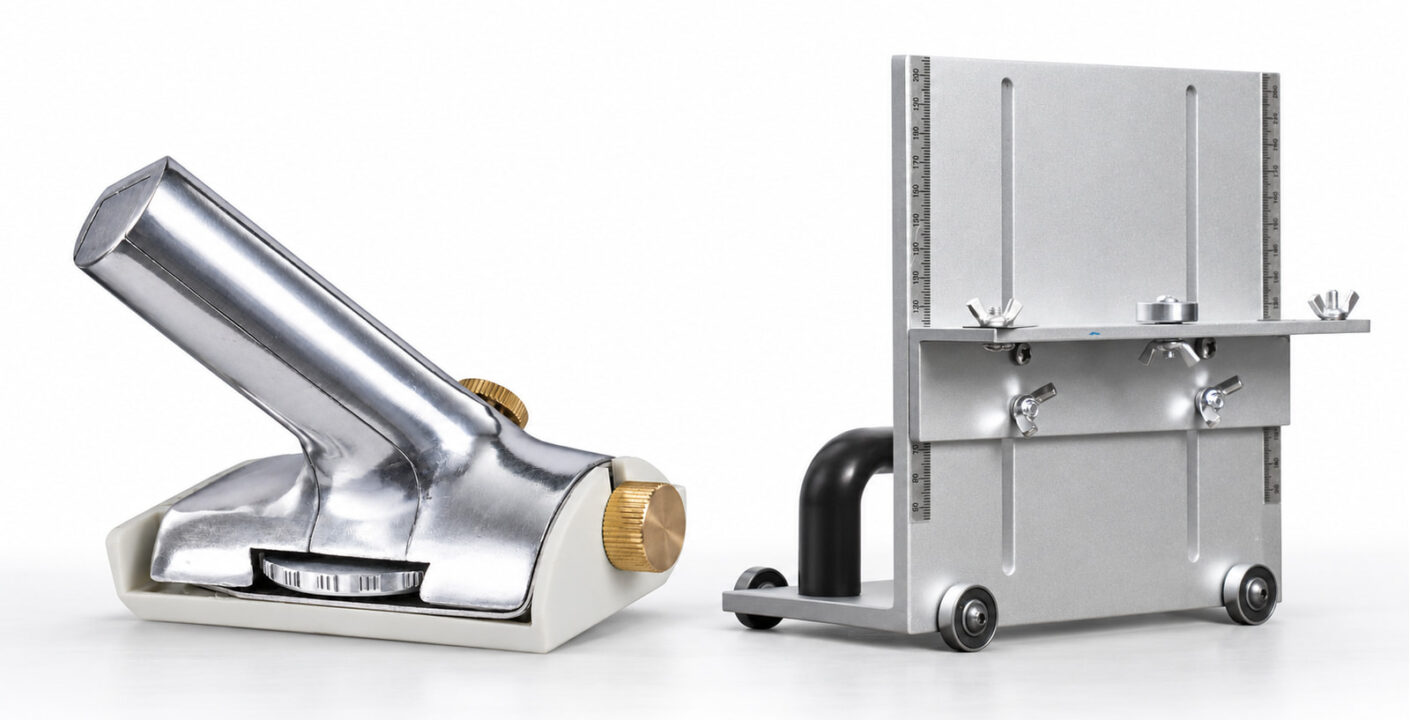
When a dealer receives a request for a “vinyl wall trimmer,” ask the customer to point to the cut on a drawing or photo. If the blade will travel across sheet flooring at the floor-to-wall boundary, start with a wall-edge trimmer. If the blade will travel along an upright sheet to finish a cove, start with a cove trimmer and check the reference for the upper cut. A request that includes both locations needs two separately defined sample cuts.
For a vinyl wall edge trimmer vs cove trimmer comparison, look at three things: where the blade meets the sheet, which surface guides the tool, and how far the blade can reach while that contact stays stable. These details let a distributor quote by application and send installers a sample they can judge against the actual job.
Match the trimmer to the position of the cut
Floor-level trimming with QBTD
The ARIK QBTD wall-edge flooring trimmer is for a flat sheet at the floor-to-wall boundary. The base sits over the sheet and the guide takes its reference near the wall. The cut depends on both contacts. On a flat, unobstructed wall run, the installer can check whether that relationship holds through the whole pass. A casing, projection, recess, or change in the floor surface can move the blade away from the intended edge even if there is still space to hold the handle.
Before quoting the model, ask what the edge must fit. The customer may need it to meet a perimeter detail, terminate at a transition, or sit within the coverage of a trim. Ask for the required edge position from the project detail and a photo taken close to floor level at the guide contact. If the wall changes shape along the run, ask for a second photo of the interrupted section. The two photos show whether the same guiding method can serve the whole perimeter or whether an endpoint needs local finishing.
Cove and upstand trimming with SQCBQ
The ARIK SQCBQ vinyl floor coving trimmer addresses the cut on compatible sheet that has turned up the wall. Its plate, slotted adjustment and rolling contact components help position and feed the tool along the trim line. For the sample, define how the sheet is supported and which surface or edge the assembled tool touches. Then check blade position with that contact established. A cut that looks level on an open bench may land differently once the sheet sits against a wall with a return or a termination profile.
Ask for a section drawing that shows the flat floor, the transition and the upright material. Mark the target finish line together with the point from which it is measured. A photo of the cutter sitting on the completed detail can show its contact points and blade position. Have the installer identify where guiding support ends at inside corners, outside corners and doorways. That gives the dealer a way to assess the main wall run and the localized cuts separately.
Read the dimensions and adjustment terms separately
SQCBQ has a listed overall size of 250 × 230 × 80 mm. Use those dimensions when identifying the assembly, checking storage, or planning the space needed to present the tool against a mock-up. Cutting height depends on the blade position relative to the reference surfaces in that setup. On a drawing, label tool size, slot travel, blade offset from the contact point, and the project’s target upstand height as separate measurements.
Have the supplier identify both ends of any stated adjustment range: the starting surface and the point on the blade or cut line that is being measured. Ask whether the range was measured with the blade fitted, the tool locked, and the guide in its actual working position. Where the product literature uses “cutting height” without a stated reference, put the customer’s required finished line on the sample drawing and verify it with the actual tool. Record the distance from the agreed reference to the finished edge on the sample.
Usable adjustment also depends on how well the tool holds a setting as it moves. A slot may let the plate move far enough to align the blade while the tool is at rest. Make the trial with the adjustment secured and recheck the cut position at several points. A reading at the start and a second one near the end can reveal movement that a static photo would miss. Include the orientation, tool version and blade used so another person can repeat the setup.
Use the same discipline for QBTD. Blade projection is the distance the cutting edge extends from its support, while the perimeter clearance is the gap required by the installation detail. Ask the installer to show that the chosen projection cuts the intended layer with the base seated and the guide engaged. Check the resulting edge position against the job requirement independently.
Check access before promising coverage
Check where the leading edge of the guide, the blade, and the handle will sit at a corner. A base can meet a return wall while the blade is still short of the mark. An upright plate can lose support near the end of an upstand before the blade reaches the termination. Mark the last point each tool can reach while its contact and alignment remain stable. In the range quotation, show whether localized finishing is included as a separate operation and which tool or accessory is proposed for it.
A mock-up with just a long, straight section only covers one part of a job. Include the tightest interruption expected on the project. On the flat run, check a casing or other projection that affects the guide. On the upright run, check a corner or termination where the plate needs clearance. Inspect the last part of the cut for a step, a tear, or a surface mark, then compare what you see with the reference marks. The vinyl floor coving tools overview shows where trimming fits alongside preparing, forming and finishing the cove.
For a range sold across several installations, record the checked material and detail on the sample label. Sheet thickness, backing and the shape of the support can change how the tool sits and how the blade feeds. A sample from one product can help explain the tool. A compatibility claim for another sheet needs evidence from that material and setup.
Quote strip preparation as its own operation
Some installers also request repeat-width strips from compatible soft sheet. In that case a vinyl strip cutter belongs on a separate quotation line, with the intended strip width, material and guide configuration. Discuss where the strip will be used and whether the flooring system calls for it. A strip cutter uses a width reference on the stock. The perimeter trimmers take their references from the assembled floor or wall detail.
Before adding a strip cutter to a range, make several cuts at the same width setting on the proposed material. Measure the strips near both ends and through the middle. Inspect the edges for waviness, ragged backing or distortion that would affect the next operation. Keep the strip samples with their own model and blade information. This lets a buyer approve repeat-width preparation separately from the wall-edge and upstand finishes.
Build a sample set a dealer can approve
Sample one: Floor-level edge
Use the customer’s sheet, backing and perimeter detail. Mark the target edge and where the wall guide will make contact. Show the base and blade position before the pass, then retain the finished edge and the waste piece. Where the installation allows the layers to be inspected, record any blade marks beneath the finished sheet. Compare the edge position and its consistency with the project’s allowed clearance at a few points, including near the end of the usable run.
Sample two: Upper edge of the cove
Use sheet supported as it would be for the actual cove. On the sample drawing, label the reference surface, intended finish line and any point where the tool loses room to feed. Record the clamp or adjustment position and which blade was fitted. Inspect the full run for drift and for scratches on the visible face. Photograph the corner or end of the pass with the cut line still marked. This shows the customer where the guided cut ends and what is left for localized finishing.
Sample three: Prepared strip, when specified
Label the material and nominal strip width, then show where the guide references the stock. Attach the width readings and retain a representative strip. If the original quote omitted strip preparation, this sample can help the dealer decide whether that separate operation warrants a third model and its replacement parts.
Ask the buyer and installer to judge each sample against the same drawing and criteria before approving an order. Label the unit or revision, blade type, fixing method, and supplied items. Retain a photo of each assembly and a copy of the instructions with the sample notes. When a different version is offered later, compare it against those records before assuming it will produce the same edge.
Put the application on the quotation line
Give each model an application name the buyer can recognize at a glance. For QBTD, use “floor-level wall-edge trimming” and attach the perimeter reference and interruption notes. For SQCBQ, use “coved-sheet upstand trimming” and attach the drawing with the height measurement origin and finish line. For strip preparation, record the stock, requested width and guide option. This makes it easier for an installer to check that the parts list matches the work ordered.
For each quoted model, identify the version in the sample, the confirmed blade and spares, the instructions and the items the supplier will actually ship. State whether a particular corner or endpoint was reached under guided contact on the trial. Where a setting or blade configuration still needs confirmation, leave it as a specific item to resolve against the sample rather than treating the complete-tool dimensions as a capacity figure.
For stock orders, review which applications your installers buy repeatedly and which require project-specific samples. The broader outils de découpe des sols en vinyle range can help map related cutting requests. Keep the quote tied to the tasks the buyer identified. A contractor asking only for a flat perimeter cut may need QBTD and its confirmed spares. A project with a coved wall run can add SQCBQ, with the upstand drawing attached. Strip preparation belongs on the order when the customer has specified the work it serves.
Frequently asked questions
Can I select a cove trimmer from the plate length alone?
Use the plate length to plan clearance and identify the assembly. Select for the finished height by measuring from the specified reference to the cutting point on the assembled sample. Check the blade reach and the stability of the locked setting during the pass.
Can I use the same sample to approve both trimmers?
You can use the same flooring material in a mock-up. Include two defined checks: the floor-level edge and the upright finish line. Record each tool’s guide contact and where the blade reaches the endpoint. That creates a record for both jobs even when they are part of one installation.
What should I send ARIK before asking for a quotation?
Send the sheet and backing details, the perimeter or cove section drawing, the required finish line, a photo of the tightest working position, and your estimated quantities. If you need strips, include their width and the stock they will be cut from. ARIK can use those details to discuss models, sample cuts and replacement blades by application.
