
Floor Covering Removal Tools
Browse This Page
Identify What Must Be Removed and What Must Stay
Record covering type, thickness, backing, number of layers and the known adhesive. Identify the substrate and any finish or membrane that must be protected. Complete the required site assessment for legacy materials before disturbing them. Define the endpoint: lift the covering, reduce a bonded layer or prepare for another treatment. A floor stripper working at a bond interface does not automatically leave concrete ready to receive a new coating or floor covering.
Use Manual Tools for Accessible Detail Work
Floor Removal Tools are candidates for local lifting, corners, edges and small areas where a machine cannot reach. Confirm the blade shape, handle and material task represented by the actual product. A hand scraper can be part of a large removal job even when the open floor is machine stripped. Select it for the detail rather than expecting it to match a powered machine's working method. Keep the exposed substrate visible and stop if the tool damages what must remain.

Compare Walk Behind and Powered Travel
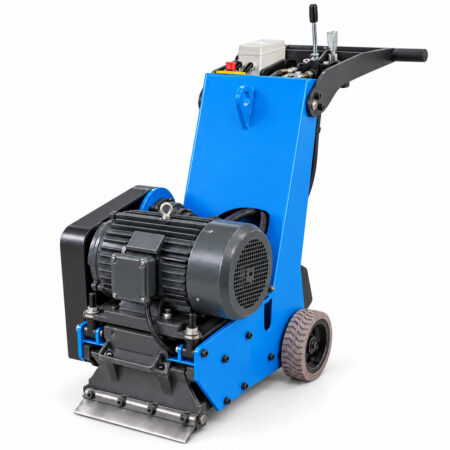
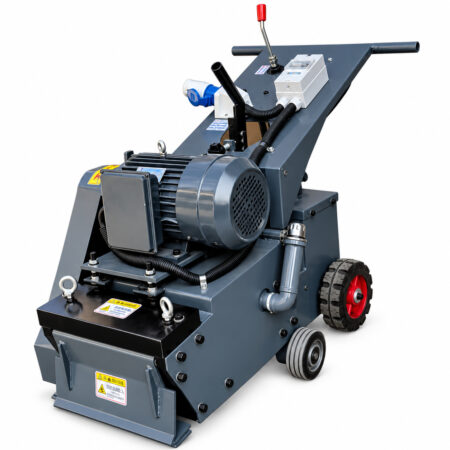
Die Walk Behind Floor Stripper is a candidate where its dimensions, blade movement and handling suit the work area. The Self Propelled Floor Stripper adds a powered travel function that must be confirmed against the selected model; review controls, turning and traction on the site. Compare both on blade suitability and the removal trial, not only area. Machine descriptions must state actual propulsion and power. A self propelled machine can still need manual completion at boundaries and obstacles.
| Selection point | What to check |
|---|---|
| Operator travel | Check operator handling of the actual model. |
| Powered travel | Confirm the drive and travel controls. |
| Blade movement | Identify the blade action and holder. |
| Turning space | Include boundaries and restricted turns. |
Check Site Access Before Choosing Ride On
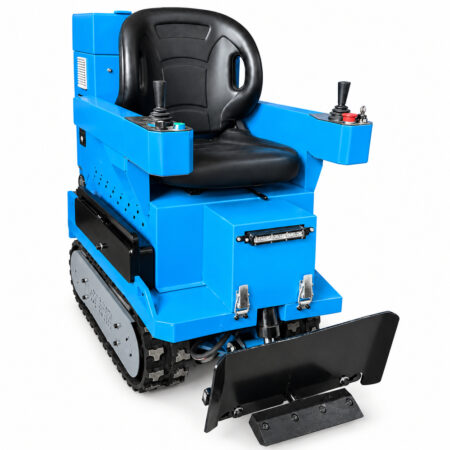
Die Ride On Floor Stripper is a candidate for accessible open areas after its operating envelope is confirmed. Review doorway clearance, turning space, lift or ramp access, floor loading, transport and charging or power requirements. Include the whole route from unloading to the work area, not just the size of the room. The driver position does not prove suitability for a delicate substrate or a particular adhesive. Use a trial with the proposed blade and machine setup.
- From $9,324.18Bulk-order price Ausführung wählen Dieses Produkt weist mehrere Varianten auf. Die Optionen können auf der Produktseite gewählt werden
Make Blade Selection Part of the Trial
Match blade width, thickness, edge, mounting and movement to the material and bond. WOLFF's blade guidance explains why firmly bonded material can call for a narrower working edge and why some blade forms suit only named machine mechanisms. Pre-cut only where the material, site and machine method permit it. Do not fit a special blade because it looks stronger; an incorrect blade can stall the work, damage the holder or gouge the substrate.
Follow a Controlled Removal Sequence
Identify the material and work boundary, expose a suitable starting edge, prepare the accepted blade and test a small area. Assess whether the blade follows the intended interface, then work in manageable passes. Remove debris so it does not obstruct travel or hide the substrate. Finish restricted edges with suitable manual tools. Inspect remaining adhesive and damaged areas before selecting the next preparation stage. Keep new-floor acceptance separate from the simple observation that the old covering has lifted.
Investigate Stalling, Gouging and Excess Residue
Repeated stalling needs review of blade condition, cut width, bond and permitted setup. Gouging calls for stopping and reviewing angle, edge orientation and substrate condition. Smearing residue can indicate the adhesive behaves differently from the material assumed in the trial. Check the failed area before increasing load or force. A successful covering lift does not guarantee complete adhesive removal; residual preparation can be a different operation with separate tooling and acceptance criteria.
Record a Trial and Request Identified Parts
Evaluate a representative patch containing the actual covering and bond, plus an edge or obstacle. Photograph the removed material and substrate, record setup and blade wear, and state the acceptable damage or residue criterion. For an equipment enquiry, provide the selected model's power or charging requirements, access route and transport constraints. For replacement blades, send machine model, mounting dimensions and holder photos. Keep parts quantities and included items clear, and request the model's maintenance and service information with the quotation.
Related Products and Guides
Häufig gestellte Fragen
Will a floor stripper remove all adhesive?
That depends on the adhesive, substrate, blade and accepted endpoint. Remaining residue may need a separate preparation operation.
Should I select ride on equipment just because the area is large?
Also confirm site loading, access, turning, transport and the actual removal trial. Area alone is insufficient.
Can I use another brand's blade with an ARIK machine?
Only after confirming the machine holder, blade dimensions and operating suitability. An external blade guide does not establish interchangeability.
What information do you need for a wholesale quotation?
Send the product names or models, configurations, quantities and delivery destination. You can include mixing buckets, spreaders, spiked rollers and shoes in the same enquiry. The applicable quantity tier, packing details and order conditions will be reviewed for the selected items.
Can you customize the logo or packaging?
Send your logo artwork, preferred placement, packaging requirements and estimated order quantity. ARIK will review the available options for the selected tools and confirm the sample requirements, order conditions and quotation before production.
Can I request samples before a bulk order?
Include the models and configurations you want to evaluate, the intended application and the delivery destination in your enquiry. Sample availability, cost and shipping arrangements need to be confirmed for the selected items before an order is placed.
Holen Sie sich jetzt Ihr Angebot
- Kontaktieren Sie uns für Ihr persönliches Angebot.
- Sparen Sie mehr mit unseren Direktpreisen!
- Wettbewerbsfähige Großhandelspreise.
- Kein Zwischenhändler, bessere Angebote.

