
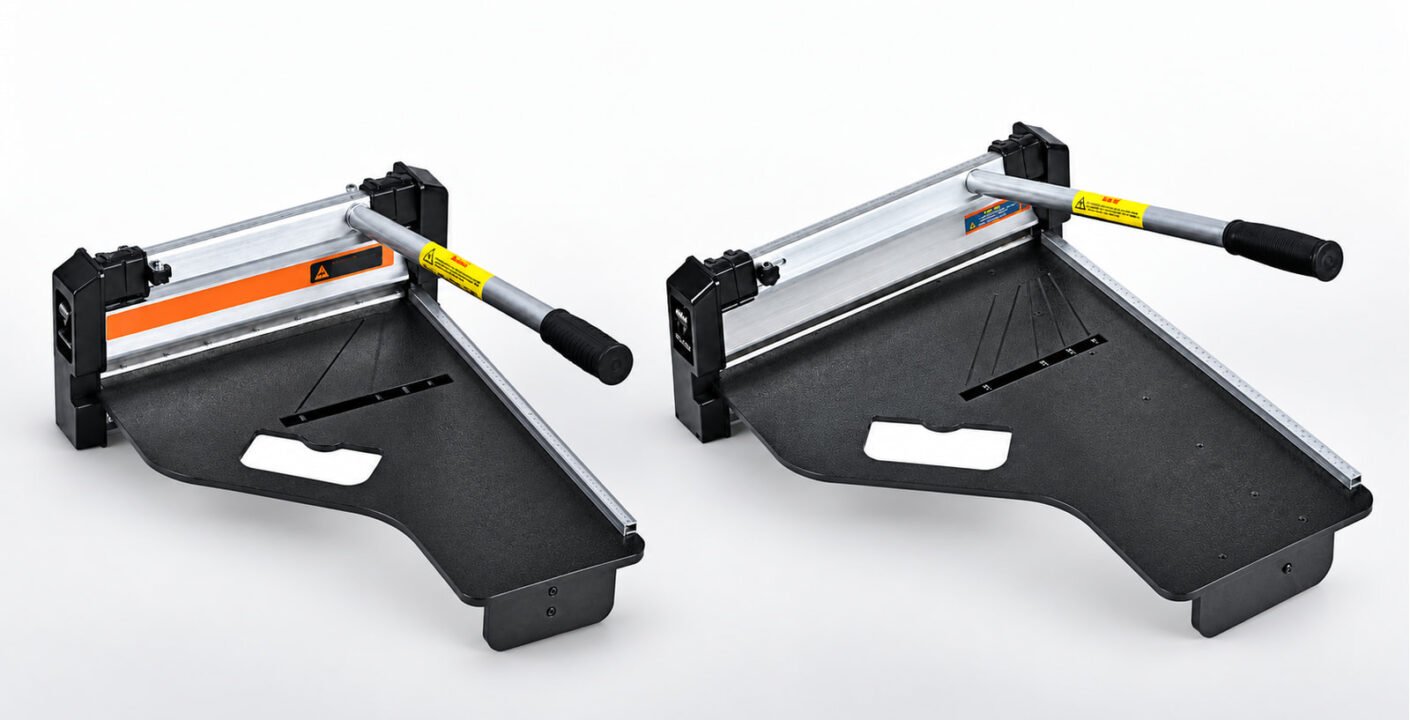
A 340mm vs 460mm manual flooring cutter comparison starts with two pieces of the same flooring and the same marked cut. For a tool distributor, the useful result is a record that shows which model handled the cut, how the edge came out, and what blade and packing configuration to order. The KC460L adds 120mm of recorded cutting width. Both models carry a stated 12mm maximum thickness, so the trial still needs to establish how the actual plank cuts.
Start with a square end cut that fits both cutters. Add the widest cut your customer expects to make, then repeat a representative cut to check consistency. Use the same acceptance criteria at each stage and keep the labeled samples with your notes.
Record What Changes Between the Two Models
Die 340mm manual flooring cutter is the KC340L. Its records list a 340mm cutting width, a 7.09kg net weight and a 340 × 28 × 2.2mm blade. The individual package is recorded as 590 × 390 × 160mm. Include it in the trial when the customer’s regular crosscuts fit the tool and the work involves moving a cutter between rooms or staging areas.
Die 460mm manual flooring cutter is the KC460L. It records a 460mm cutting width, an 8.35kg net weight, a 460 × 28 × 2.2mm blade and a 590 × 520 × 160mm package. The 120mm increase in cutting width comes with 1.26kg of additional net weight and a wider carton. Use the recorded figures to plan the trial and confirm the actual sample dimensions before finalizing stock or freight arrangements.
Put the shared 12mm figure on the specification sheet. Put the flooring brand, product code, measured thickness, core and backing on the trial sheet. Flooring with the same measured thickness can have a different core, surface layer or backing. Record whether the delivered model and the exact flooring in front of you meet the job’s requirements.
Prepare Two Sets of Matching Planks
Use pieces from the same flooring product and, where practical, the same carton or production lot. Mark them with a sample ID and indicate the wear face, the edge that must be retained, and the cut line. For click flooring, identify any factory locking edge the installation needs to preserve. Keep the offcut large enough to handle and support as specified for the tool.
Set both tools on stable, level surfaces and provide the same practical support for the length of plank extending beyond the table. Record the condition of each blade and confirm the cutter is assembled according to the instructions for that unit. Start with the same operator, material orientation and inspection method. If a second operator will use the cutter during demonstrations, have them repeat a representative cut after the baseline comparison.
Agree on the intended use of the cut edge before making the first cut. For a row-end piece, check the required fit and the edge that will engage with adjacent flooring. If a finished edge will be visible, agree on the appearance expected at that location. Ask the flooring installer or buyer to set the fit and appearance criteria for the job and include them in the sample record.
Run the Same Cut on Both Cutters
1. Establish a common baseline
Start with a crosscut that fits both cutting openings. Mark an identical length on two comparable pieces, align the mark using the same reference edge, and support both pieces the same way. Cut once on each model. Before inspecting the edge, note whether the plank stayed flat and aligned, whether the cutter shifted, and whether the handle travel felt controlled throughout the cut.
Record operating effort on a consistent descriptive scale. For example, the same operator could record a smooth stroke, a noticeable increase in resistance, or a stop that required checking the setup. This observation helps a buyer repeat the trial. Follow the tool instructions and stop if the material shifts, binds, or requires forcing the handle. If you adjust support or replace a damaged blade, record the change and repeat the baseline on fresh pieces.
2. Check the largest cut the customer needs
Mark the largest representative cut on the actual plank and measure along the line in the cutting position. Confirm the cutter can locate and support the plank on that line. If the task fits the KC460L and exceeds the KC340L opening, test it only on the KC460L. Record the KC340L as outside the required span for that cut and keep the common baseline results for the comparison.
For an angled task, test the actual orientation and support arrangement. The cutting line can be longer than the plank is wide, and the workpiece still needs to sit securely on the tool. When a job includes lengthwise cuts or irregular openings, review the appropriate Werkzeuge zum Schneiden von Vinylböden for those operations. Keep those tasks as separate rows in the purchasing checklist.
3. Repeat a typical cut
Cut a small run of matching pieces at the length your customer uses most often. Inspect the first and later pieces against the same mark and fit criteria. Note how often the operator has to reset the plank, whether alignment stays consistent, and whether the support arrangement is practical to repeat. If a single demonstration piece looks good but later pieces vary, review the setup and repeat that part of the trial before accepting it.
Inspect the Retained Piece and Keep the Evidence
- Face and cut line. Check for chipping, whitening, dents and surface marks at the blade line. Check the cut against the mark and confirm the retained piece meets the agreed length and alignment.
- Core and backing. Turn the piece over and look for a fractured core, an incomplete cut or backing separation. Keep any piece with a defect and photograph it under consistent lighting.
- Locking profile. Where the design calls for a factory profile to remain, check for cracking or distortion near the cut. Dry-fit the retained piece with a matching plank as appropriate to the flooring system.
- Repeatability. Put the pieces from the same cutter side by side. Record the specific defect and its location, as well as the cut type and support setup, so the trial can be repeated.
Keep one line per trial with the tool model, sample ID, thickness, marked cut span, orientation, blade condition, edge observations and fit result. Record the outcome for each task as accepted, needs retesting, or outside the supported task range. That record gives a distributor a concrete basis for a customer demonstration or an order recommendation. For a wider assortment of tasks, see how to choose vinyl floor cutting tools.
Verify the Blade and Delivered Configuration
Confirm the exact model on the sample and on the carton. Match the replacement blade by model and supplier part number. Ask for the mounting hole pattern, fastener details and replacement instructions for the supplied version. The blade measurements in the product records are a starting point for identification. Have the supplier confirm fit against the cutter version that will ship, and keep separate spare-part records for the KC340L and KC460L.
Ask the supplier to confirm carton dimensions, actual gross weight, handle assembly, blade protection and included accessories. The published net weights describe the cutters. Use the confirmed packed weights and dimensions for the shipment. If a sample will serve as the acceptance reference for a larger order, keep its label and carton photographs, its blade reference and a copy of the cut record with the purchase documents.
For a wholesale flooring tools order, share the quantity by model, flooring product, measured thickness, widest cut, required spare blades and shipping destination. Confirm who will compare the delivered units with the accepted sample and which checks will be repeated on arrival. Include any required labeling, packing or replacement-blade arrangements in the quotation or order confirmation.
Choose the Cutter Based on the Accepted Cuts
If both models pass the common trial and the full job fits within 340mm, weigh the KC340L’s lower net weight and smaller carton against the jobs your customers handle. If the job requires an approved cut above 340mm that fits within the KC460L’s capacity, keep that cut as a separate acceptance sample for the wider model. For a new floor construction, run a fresh matched trial and save the result with the model and blade reference.
