
A distributor comparing a spatula vs quarter moon knife for vinyl weld trimming should ask for the actual knife and guide configuration, then compare both on equivalent sections of a welded offcut. Record how the edge meets the rod, what supports the cut and whether the installer can hold the intended angle from entry to exit. When the flooring instructions permit both tools, compare the first-stage allowance and the cooled finish separately.
The choice matters after the first sale, too. The installer may need a replacement blade, another guide or a way to protect the edge in storage. Identify those parts when approving the sample so a repeat order can reproduce the configuration that worked. This comparison uses two ARIK models to show what to verify.
Compare the cutting structures
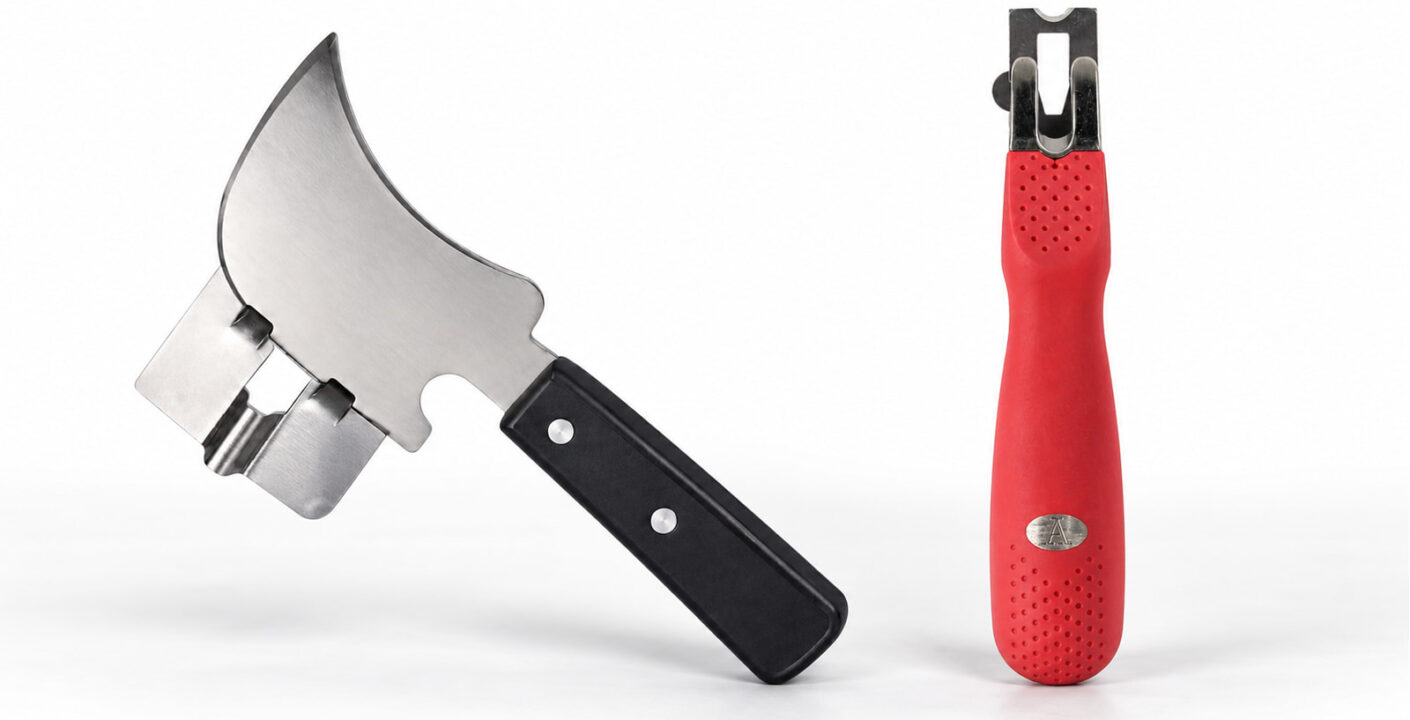
The ARIK crescent-blade weld trimming knife, model YYWD, uses a broad curved blade with a separate grip. Start by setting it in the intended working position on a sample. Look across the seam and observe which portion of the edge reaches the raised rod. Then look along the seam to see how the blade and grip travel as the cut begins and ends. A change in handle angle can shift where the curved edge contacts the rod.
The red-handled ARIK CPQ spatula-style weld trimmer uses a spatula-type cutting head at the end of the grip. On the sample, watch how the head is supported and whether its working edge stays centered as the operator moves along the seam. The blade holder and any guide specified for the cut affect the tool’s position. Ask for a clear view of the assembled head, including the surfaces that rest near the rod.
For either model, check the contact path through a complete stroke. A static photo tells you where the tool fits at one position. A sample pass lets you see whether the installer can enter the cut, maintain support and leave the rod without tipping the blade into the sheet. Look at the leading and trailing ends as closely as the middle of the pass.
Keep the measurement scopes separate
The current YYWD record gives approximate blade dimensions of 200 × 70 × 2.03 mm. Request separate measurements of the complete knife and its net weight, and confirm the handle material on the proposed sample. Where the guide changes the working profile, ask the supplier to photograph and measure the fitted assembly as well.
The current CPQ record gives complete-tool dimensions of 170 × 30 × 28.5 mm and a complete-tool net weight of 160 g. Ask for its blade dimensions separately if they matter for replacement sourcing. If working clearance is the purchase decision, record the space the assembled tool and the operator’s hand require during the cut.
Keep each value with a photo showing the measurement points. For instance, record blade width across the part and entry clearance in the working position as separate fields. A blade outline establishes its external shape. The actual contact area on the rod depends on the working angle, guide and seam profile.
Check grip and clearance where the seam ends
Begin on an open, flat sample so both tools can be held in the working position. Have the installer use the gloves and posture they would use for the job. Note how easily they can see the edge and keep the guide supported. If the tool needs a second hand for control according to its instructions, include that hand when judging the space required.
Then reproduce a restricted entry or exit, such as a flat seam ending beside a door frame. Check whether the end of the grip or the outer part of the blade reaches the obstruction while the edge still has rod to cut. Observe the last part of the stroke for handle roll, lifting of the guide or a change in the sight line. A tool that feels controlled in the middle of a run may need a different approach at the end.
For an inside corner or a coved seam, start with the flooring system’s specified tool and cutting path. Ask the supplier to identify which weld trimming tools are intended for the flat run and which cover the detail. If the straight run and corner require separate tools, show that on the order so the customer can prepare both stages of the job.
Check the guide and blade together
Review the floor manufacturer’s instructions before comparing setups. The Forbo vinyl heat-welding guide illustrates a crescent knife and plate for the preliminary trim in its two-pass procedure. The Altro Kitchen Advantage installation guide illustrates a spatula knife and plate for flat seams, followed by a final cut after the rod cools. These examples describe the respective flooring systems. Use the instructions for the material being tested to set the permitted tools and timing.
For each candidate, identify whether the first-pass support is a separate plate, a guide fitted to the head or another specified arrangement. Photograph it fitted from the side and from the front so the buyer can see how it sits against the blade and rod. Check that the support makes stable contact where intended. Confirm how the setup is configured for the final pass.
Ask for the exact part reference of the guide, blade and holder when they are separate items. Check the mounting shape, hole or slot positions, thickness, retention and cutting edge orientation for any proposed replacement. Use the cutting and trimming blade compatibility guide to organize the information needed for the enquiry.
Confirm the supplied contents in writing. The cover shows a crescent knife with a support piece for comparison. Ask the supplier to identify the pictured part, confirm its fit and state whether it ships with the chosen version or as a separate item. Use the same check for a spare blade and edge protector. Record the care instructions for the blade, including whether the supplier permits sharpening or calls for a replacement.
Run a fair comparison on welded offcuts
Prepare two comparable sections with the same flooring, specified rod and groove. Use the same welding setup and a competent installer. Keep the sample support, working space and lighting consistent. If the floor manufacturer permits only one type of tool for the job, use that requirement to define the sample order. Where both candidates are permitted, test each with the guide specified for its configuration.
Choose the matching stage for each comparison. For a two-pass system, make each initial cut at the permitted stage and leave the required allowance. If the same installer cannot reach both samples at equivalent times, prepare the samples in sequence so each gets the same waiting interval and conditions. Record the welding and trimming times for each section. Then wait for the required cooling condition and evaluate the final cuts.
Give each tool its own sample record. Label the flooring, rod, tool, guide and blade condition. Record which installer made the cut and where the seam was flat or restricted. On the first pass, compare the remaining rod at the start, middle and end. On the final pass, examine the cooled seam from the same angle and under the same light. Take a photo from each viewing direction so the observations can be checked later.
- First-pass allowance. Look for a continuous, even amount of rod left after the guide-supported cut. Note where the guide rocked or the rod dragged.
- Cooled finish. Compare remaining ridges, low spots and any change in the seam profile across the pass.
- Adjacent flooring. Inspect both sides for contact marks or scratches and identify where the marks began.
- Access and control. Record where the blade entered and left the rod and how much working space the grip needed.
Repeat an affected section if the blade is damaged, the guide moves out of position or the samples reach different trimming stages. Keep a note of why the run was repeated. This separates a correctable setup difference from a repeatable difference in the way each tool handles. Evaluate weld acceptance using the flooring system’s method in addition to checking the trimmed profile.
Record where the result changes
Suppose both samples finish evenly on an open seam, but one tool leaves a ridge at the simulated door frame. Compare the two starts and exits. A photograph may show that the grip reached the frame before the edge cleared the rod. Record that limitation against the available space and configuration. A second trial with the approved detail tool can establish what the crew needs to finish that location.
If the difference occurs through the middle of the cut, look first at blade condition, guide contact and working angle. For example, a mark that follows one side of the seam may show where the head tilted or where debris was caught under the support. Check those points on a fresh section of the same sample. Record the observed result alongside the possible cause so the next trial can confirm it.
Verify that a second installer can repeat the result
Once the first comparison is complete, hand the accepted setups and your notes to a second installer who will use the tools. Prepare fresh sections of the same material and repeat the checks that drove the decision. Compare whether both installers can maintain the intended guide contact and finish at the restricted end. If their observations differ, record the grip position and how each person entered and left the cut. An order for a team should reflect the working space and handling requirements that team will encounter.
Use a separate result for each permitted stage and location. A sample can pass the first trim in an open run and still need a different tool at the far end. It can also leave the intended allowance but produce a mark when the guide is removed for the final pass. A short entry such as “open run, first pass, allowance even, no guide marks” tells a buyer more than a single pass mark for the whole kit. Keep the final trim observation on its own line.
Turn the sample result into a stocking decision
Choose the configuration that meets the customer’s specified flooring procedure and passes the relevant open-run and detail checks. Keep the accepted sample, images and supplier references together. If both tools pass, use the recorded handling observations and the customer’s expected replacement needs to decide how many of each to stock.
For YYWD, record the measured complete-knife dimensions, handle material and net weight of the accepted sample along with the approximate blade dimensions already supplied. Add the guide and protector details that the supplier confirms. For CPQ, keep the complete-tool dimensions with a photo of the head and a separate record for the blade and guide that fit the approved sample.
On the quotation, list the knife, guide, spare blades and edge protection individually, with their quantities and how they will be packed. Ask the supplier to flag any changed part reference or construction on a repeat order. Compare the delivery with the accepted setup before substituting a replacement in a customer’s kit.
Keep a receiving check for the parts that influence the result. Compare the supplied guide with the approved photo before opening the whole shipment. For a separately ordered blade, match the reference, mounting features and edge orientation on one sample assembly using the tool instructions. If the supplier changes a part, record the new combination and repeat the affected seam check before adding it to the same stock record.
Questions before placing an order
Can I compare the blade and body widths from the product sheet?
Compare dimensions measured across the same part. YYWD has a recorded blade width and CPQ has a recorded complete-tool width. Ask for both blade widths or both complete-tool widths if those values are needed. For seam access, use the fitted tool and grip clearance observed during the trial.
Can one guide fit both styles?
Confirm the guide connection and support position on the actual tool. Use its part reference and dimensions to verify the proposed match, then check how it sits on the representative seam. Record the specific knife and guide together when requesting a spare.
What should I send with a sample enquiry?
Include the flooring and rod, the trimming stages specified for the job and the tightest detail your customer expects to finish. Name the knives, request the guide and blade configuration for each, and state the quantities and destination. The supplier can then identify the offered parts and packing so the samples can be checked against the same order record.
